Visual
material is one of the main and important tools in teaching robotics. Graphic
information helps you better understand the theory and understand complex
issues. Therefore, we use the Studio 2.0 program, which is an indispensable
tool for creating visual materials.
It was no
coincidence that we choose this program - first we viewed some of existing
products. To this date, the number of programs for building graphical models of
robots from Lego is not that large enough, but there are some to choose from.
For a long time, the leader was (and for some remains) the Lego Digital
Designer software product - this is an official graphic editor from Lego
company. In more detail, the features of work in it are considered in other our
article.
Back to Studio 2.0, the program’s tagline is “Build, render, and create instructions. Do it all in Studio 2.0. " Thus, this program includes tools for both creating the model itself and developing step-by-step instructions. And in addition to these basic functions, there is the ability to make the most photorealistic render of the model. Interface of program - in English.
Studio 2.0
include the parts library of Bricklink Lego community. It is very extensive and
covers many lines of Lego parts - from ordinary bricks to specialized Technic
parts, as well as most electronic components (Wedo, EV3). It is the last two
series of robotic educational kits - Wedo 2.0 and EV3 Mindstorms that serve as
the main element base for creating robot models. By the way, the library is
often upgrade with new details, which expands the modeling capabilities.
The main window of program can be divided into five main parts:
-
Control Panel (1) - located at the top, contains drop-down tabs of functions available in the program
-
Working Area (2) - the place where the designed model is located.
-
Parts Library (3) - located at the bottom.
-
Color Palette (4) - located on the upper right.
-
Step List (5) is located on the right, under the color palette.
It is a familiar everyone navigation bar.
File - work with the current document (open, save, etc.)
Edit - editing mode (copy, delete, paste, etc.)
Model - the mode of working with the model (adding a step, creating a submodel, etc.)
View - setting of the working area (scaling, model view - frontal, isometric, etc.)
Tools - two operating modes - creating instructions for the model (Instruction Maker) and modeling parts with a unique design (Part Designer)
Bricklink - Log in to your Bricklink account.
Help - help information on working with the program.
Most of the main program window is intended for the working area. Using the mouse or hot keys, you can set and adjust the desired view and scale. Also, using the functions of the View, you can set the desired mode of displaying the model.
As mentioned earlier, the parts available in Studio 2.0 are the entire variety of details of Lego Bricklink.
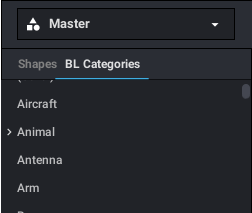
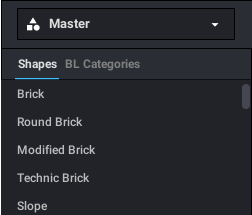
Parts are searched in several ways:
1) Selecting a part according to its shape (Shape) - brick, round brick, etc.
2) Part selection by category (BL Categories) - animals, fences, etc.
3) Selecting a part by its name (in English).
4) Selecting a part by its number.
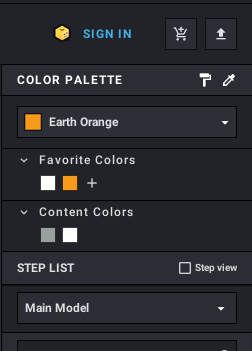
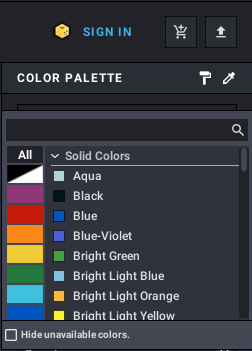
By default, all parts that you move to the work area are white. The task is to select the optimal color from the existing palette.
In the drop-down list, the main color is selected (seven rainbow colors and black and white colors), and then a suitable shade.
There are also two tabs in the color pallete:
1) Favorite Colors - the most commonly used colors - are added manually for quick search.
2) Content Colors - displays all the colors used in this model.
Step list - is a place for steps of building the model. That is, at each specific step, a certain amount of detail is added. Having completed all the steps, you will get a finished model. The number of steps to divide the design is a creative and personal matter, depends on the complexity of the assembly, the connection with the basic elements and many other factors.
In the following articles, we will discuss how to use the tools for creating step-by-step instructions and photorealistic renderings. If you don’t have time to comprehend all the wisdom of the interface and the lesson of robotics will be tomorrow, then you can use the instructions for building robots from the educational designer Lego Wedo 2.0, developed by our team. Some of the assemblies are free, some have their own cost - choose to you want and make your robotics teaching fun!
Link to the catalog of instructions - https://roboinstruction.com/downloads/